Um blog sobre nada

Um conjunto de inutilidades que podem vir a ser úteis

Archive for the ‘Python’ Category

Python – Integration with Google Sheets

Posted by Diego on August 24, 2020

Setting things up:

  1. Go to console.cloud.google.com/
  2. Create a new project
  3. Search for google sheets API
  4. Click “Enable API”
    1. Do the same for the google drive API
  5. On the google sheets API -> create credentials
    1. Click on the “Service Account” link
      1. Add a name and keep clicking next (I haven’t selected any of the “optional” stuff”)
  6. Click on the Service Account created
  7. Scroll down to “keys” -> create key
    1. Select JSON

Integration:

The credentials file has a “client_email” field. You need to share the spreadsheet you want to query with that email.

Python:

pip install gspread_dataframe gspread oauth2client

import gspread
from gspread_dataframe import (get_as_dataframe, set_with_dataframe)
from oauth2client.service_account import ServiceAccountCredentials
import pandas as pd

FILE_KEY = "YOURFILEKEY"
SHEET_NAME = "SheetName"

def _get_worksheet(key,  worksheet_name, creds) -> gspread.Worksheet:
    scope = ["https://spreadsheets.google.com/feeds",
             "https://www.googleapis.com/auth/drive"]
    credentials = ServiceAccountCredentials.from_json_keyfile_name(creds, scope)
    gc = gspread.authorize(credentials)
    wb = gc.open_by_key(key)
    sheet = wb.worksheet(worksheet_name)
    return sheet

def write(sheet: gspread.Worksheet, df: pd.DataFrame, **options) -> None:
    set_with_dataframe(sheet, df,
                     include_index=False,
                     resize=True,
                     **options)
    
def read(sheet: gspread.Worksheet, **options) -> pd.DataFrame:
    return get_as_dataframe(sheet,
                     evaluate_formulas=True,
                     **options)


sh =  _get_worksheet(FILE_KEY, SHEET_NAME, "./credentials.json" )
df = read(sh)

FYI: the file key if the sheet’s unique identifier. The part from the URL after “https://docs.google.com/spreadsheets/d/”

Posted in Python | Leave a Comment »

Python – “Error: pg_config executable not found.” While trying to pip install psycopg2

Posted by Diego on December 16, 2019

According to the Psycopg documentation, “Building Psycopg requires a few prerequisites (a C compiler, some development packages)”

If you try to “pip install” Psycopg without those requirements met, you are likely to get the error above.

As an alternative option,  you can obtain a stand-alone package (pre-compiled binaries), not requiring a compiler or external libraries, by installing the psycopg2-binary package from PyPI by instead doing:

pip install psycopg2-binary

Source: https://pypi.org/project/psycopg2-binary/

Posted in Python, Uncategorized | Leave a Comment »

Installing awscli on Cygwin

Posted by Diego on June 21, 2017

The normal way of installing the aws-cli is simply by running pip install awscli
However, If you do that from cygwin, it will install awscli in Window’s Anaconda Python installation, instead of in Cygwin’s Python (which is what we want). Then, when you run aws configure, you will get an error that the aws executable can’t be found. Like the one bellow (I have my python installed at c:\Anaconda2) :


can't open file '/cygdrive/c/Anaconda2/Scripts/aws': [Errno 2] No such file or directory


If I use the  which command to find out where python is installed, I can see it is looking at my windows installation:


The solution is to try the following from a cygwin shell:

wget rawgit.com/transcode-open/apt-cyg/master/apt-cyg
install apt-cyg /bin
apt-cyg install python
wget https://bootstrap.pypa.io/get-pip.py
python get-pip.py


At this point you can verify that python is installed in cygwin

 and then run:

pip install awscli


Posted in AWS, I.T., Python | Leave a Comment »

Using Spyder with the interpreter set by conda environment

Posted by Diego on May 31, 2017


Using anaconda, you can create an environment named "python3env" for example, and install the latest version of Python 3 as follows:


conda create -n python3env python=3 anaconda

activate python3env


After activating the environment, by just typing spyder, you will launch it using the 3.x interpreter:


clip_image001

clip_image003


More info: https://www.continuum.io/blog/developer-blog/python-3-support-anaconda

Posted in Python | Leave a Comment »

Easiest way to install xgboost on windows (download binaries – no need to compile )

Posted by Diego on April 5, 2017

1) (I am assuming both git and Anaconda are already installed).

2) Choose a place to have the installer files and clone the git repo:


git clone https://github.com/dmlc/xgboost.git xgboost_install

clip_image002


3) Download the libxgboost.dll file from here and copy it to the xgboost folder on: <install_dir>\python-package\xgboost\


clip_image004


4) Navigate to the python_package folder and run:

python setup.py install

clip_image006

That should work fine.

If, however, you get the error bellow – like I did – when trying to import the library:


WindowsError: [Error 126] The specified module could not be found


here’s what I recommend:

After some debugging I found out the problem was on the from .core import DMatrix, Booster command, more specifically, on the “_load_lib()” function inside Core trying to run this line:


lib = ctypes.cdll.LoadLibrary(lib_path[0])


where lib_path[0] was precisely the file path for the libxgboost.dll I had just copied to the xgboost folder.

Since I was sure the file existed, I realized that maybe the DLL depended on other DLLs that could not be found. To check that, I downloaded dependency walker from this link, which showed me that the required VCOMP140.DLL was missing:


image


After some goggling, I discovered that the most common cause for that is that my machine did not have the C++ runtime installed, which I downloaded from here and eventually solved my problem:

image


Posted in Data Science, Machine Learning, Python, xgboost | Leave a Comment »

How to install PyGame using Anaconda

Posted by Diego on June 14, 2016


Search the package using:

binstar search -t conda pygame


package


Install the package for the desired platform:


conda install -c https://conda.binstar.org/prkrekel pygame


package2

Posted in Python | Leave a Comment »

Docker Containers on Windows

Posted by Diego on February 23, 2016

This post is a follow up on kaggle’s “How to get started with data science in containers” post
I was having some trouble setting up the environment on windows so I decided to document my steps\discoveries.
I also (like to think that) I improved the script provided a little by preventing multiple containers from being created.


As the post above indicates, the first thing you have to do is to install Docker: https://docs.docker.com/windows/

Because the Docker Engine daemon uses Linux-specific kernel features, you can’t run Docker Engine natively in Windows. Instead, you must use the Docker Machine command, docker-machine, to create and attach to a small Linux VM on your machine.

The installer is really strait forward and after it is completed, it will have a link to the Quick start Terminal in your desktop. When you run it, the “default” machine will be started, but as is mentioned on the kaggle’s post, “ it’s quite small and struggles to handle a typical data science stack”, so it walks you through the process of creating a new VM called “docker2”. If you followed the steps, you will be left with two VMs:


image


To avoid having to run

docker-machine start docker2
eval $(docker-machine env docker2)

to change the VM every time you launch your CLI, you can edit the start.sh script it calls and change the VM’s name so it will also start the docker2 VM


image                          image


image


When you login you should be in your user folder “c:\users\<your_user_name>.

You can see that I already have Kaggle’s python image ready to be used and that I have no containers running at the moment:


image


To make thing simpler (and to avoid seeing all the files we normally have on our user folder), I created and will be working inside the _dockerjupyter folder.

Inside that folder, I created a script called StartJupyter, which is based on the one found on the tutorial, but with a few modifications.

There is of course room for improvement on this script – like making the container name, the port and maybe the VM name (in case you chose anything else than “docker2”) parameterized.


CONTAINER=KagglePythonContainer

RUNNING=$(docker inspect -f {{.State.Running}} KagglePythonContainer 2> /dev/null) #redirect to STDERR if can't find the KagglePythonContainer (first run)

if [ "$RUNNING" == "" ]; then  
	echo "$CONTAINER does not exist - Creating"
	(sleep 3 && start "http://$(docker-machine ip docker2):8888")&	  
	docker run -d -v $PWD:/tmp/dockerwd -w=/tmp/dockerwd -p 8888:8888 --name KagglePythonContainer -it kaggle/python jupyter notebook --no-browser --ip="0.0.0.0" --notebook-dir=/tmp/dockerwd
	exit
fi


if [ "$RUNNING" == "true" ]; then  
	echo "Container already running"
else
	echo "Starting Container" 	
	docker start KagglePythonContainer	
fi 

#Launch URL
start "http://$(docker-machine ip docker2):8888"  


The two main modifications are the “-d” flag that runs the container on the background (detached mode) and the “– name” that I use to control the container’s state and existence. This is important to avoid creating more than one container, which would cause a conflict (due to the port assignment) and leave it stopped. This is what would happen:

image


The ”-v $PWD:/tmp/dockerwd” will map your current working directory to the “:/tmp/dockerwd” inside the container so Jupyter’s initial page will show the content of the folder you are at.

Running the code will create and start the container in detached mode:


image


It will also open the browser on your current working directory where you’ll probably only see the StartJupyter script you just ran. I’ve also manually added a “test.csv” file to test the load:


image


By creating a new notebook, you can see the libraries’ location (inside the container), see that the notebook is indeed working from /tmp/dockerwd and read files from your working directory (due to the mapping made) :


image


Now, since we started the container in detached mode (-d), we can connect to It using the exec command and by doing so, we can navigate to the /tmp/dockerwd folder, see that our files are there and even create a new file, which will of course be displayed on the Jupyter URL:

docker exec -it KagglePythonContainer bash


image


We can also see that we have 2 different processes running (ps –ef):

FYI: you will need to run

apt-get update && apt-get install procps 

to be able to run the ps command


image


At last, as mentioned before, the script will never start more than one container. So, if for some reason if you stop your container (if your VM is restarted for example), the script will just fire up the container named “KagglePythonContainer”, or it wont do anything if you call the script with the container already running. In both cases the Jupyter’s URL will always be displayed:

image


In order to understand docker, I highly recommend these tutorials:

https://training.docker.com/self-paced-training

Posted in Data Science, Docker, I.T., Python | Leave a Comment »

Dynamic Parameters on Tableau

Posted by Diego on October 29, 2015


This is my solution to deal with Dynamic Parameters on Tableau.

Just to recap, the problem is related to the fact that, once a parameter list is populated on Tableau Desktop and the workbook is deployed to the server, is it not possible to update the list if new values are required.


I should start by saying that this is not a simple solution. 

I mean, the code actually is but unfortunately there is more to it, mainly because it will require you to republish the dashboard using tabcmd (or any other means) each time you want to change the parameter.

But that’s what I’ve got until Tableau decides to support this so requested functionality.


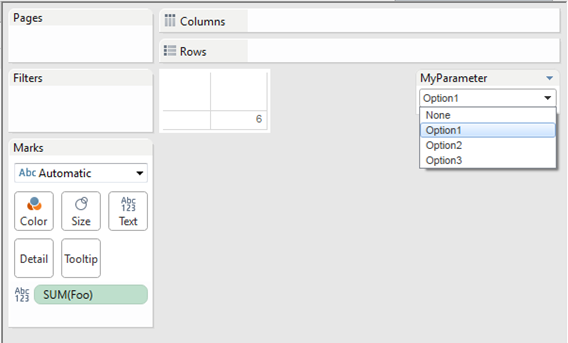
My idea is to use python to access the workbook’s XML, navigating the tree to the desired parameter (on my example called “MyParameter”), clear it’s values (except for the value “None” – this is my particular use case and can be removed very easily) and then inject the desired new values based on a list.


This is a before\after example – as expected, the list has been updated:


clip_image001clip_image003


And here is the core code:

def ParameterUpdate(envname, dashboardname):
    #the 5 lines bellow are optional. It can be used if the Source\Destination Dashboards are expected to be on a
    #different path than the one the python file is executing, which is often the case, but not for this example:
    configfile = resource_filename(__name__, 'tableau.ini')
    config = ConfigParser.ConfigParser()
    config.read(configfile)
    inputdir = config.get(envname, "InputDirectory")
    outputdir = config.get(envname, "OutputDirectory")

    #reads the twb file
    tableaufile = ElementTree.parse('{0}/{1}.twb'.format(inputdir, dashboardname))

    #gets a list with the new parameters
    new_parameter_list = __getNewParameterlist()

    #gets the root XML
    fileroot = tableaufile.getroot()

    #finds the parameter called "MyParameter"
    xmlsection = fileroot.find("datasources/datasource/column[@caption='{0}']/members".format("MyParameter"))

    #Inject the new list into the XML file
    __injectParameters(xmlsection, new_parameter_list)

    newxmlfile = ElementTree.tostring(fileroot, encoding='UTF-8', method='xml')

    filelocation = '{0}/{1}.twb'.format(outputdir, "Output")
    with open(filelocation, 'w') as text_file:
         text_file.write(newxmlfile)


Of course, this solution requires a whole messaging system between whatever process triggers the parameter update, the python code and the tab cmd that deploys the dashboard, which I won’t be covering here because it is out of this post’s scope.


The complete code and a working examples can be fully downloaded here.


OBS:

Due to the nature of ElementTree, this code only works on python 2.7 (Not sure about latter versions – I’d imagine it does; pretty sure it doesn’t work on 2.6)


OBS2:

I have been recently shown by one of the product managers on Tableau this other workaround using java script on the server:

https://www.youtube.com/watch?v=6GlNxEN1Guw

Which I’d honestly consider hadn’t I spent time writing my own solution.

Posted in Python, Tableau | Leave a Comment »

Twitter Data Analysis

Posted by Diego on July 29, 2015

With the recent Windows 10 release I decided to bring back to life an old python code that I wrote over an year ago that analyses twitter data. I was interested in seeing how people are reacting to the release.

The code is divided in two parts, the “GetTwitterData.py” that, as the name implies, fetches data from twitter and the “Sentiment.py” that analyses text for positive\negative sentiments.


1.Get the data

To access the Twitter API its necessary to create an application at (https://dev.twitter.com/apps). I won’t go through details on how to do that because there are plenty of tutorials online.

The code to get the data has a lot of comments in it so shouldn’t be hard to understand it. One thing to note is that there is some level of “hard coding” in it. For example, the “search term” (in this case, Microsoft) and the “mode” are set on the file itself.

Regarding the “mode”, there are 2 ways the function can work, “topN” or “live track”. The first one will output the latest N tweets on a particular subject while the second will output tweets as they are being generated in real-time (you will need to interrupt the program to make it stop).

Code:


#Used to fetch live stream data from twitter.
#To get credentials: "https://dev.twitter.com/apps"

import oauth2 as oauth
import urllib2 as urllib
import json
from pprint import pprint

api_key = "XXXXX"
api_secret = "XXXXX"
access_token_key = "XXXXX-XXXXX"
access_token_secret = "XXXXX"


_debug = 0

oauth_token    = oauth.Token(key=access_token_key, secret=access_token_secret)
oauth_consumer = oauth.Consumer(key=api_key, secret=api_secret)

signature_method_hmac_sha1 = oauth.SignatureMethod_HMAC_SHA1()

http_method = "GET"


http_handler  = urllib.HTTPHandler(debuglevel=_debug)
https_handler = urllib.HTTPSHandler(debuglevel=_debug)

def twitter_track(url, method, parameters):
    req = oauth.Request.from_consumer_and_token(oauth_consumer,
                                             token=oauth_token,
                                             http_method=http_method,
                                             http_url=url,
                                             parameters=parameters)

    req.sign_request(signature_method_hmac_sha1, oauth_consumer, oauth_token)
    headers = req.to_header()

    if http_method == "POST":
        encoded_post_data = req.to_postdata()
    else:
        encoded_post_data = None
    url = req.to_url()

    opener = urllib.OpenerDirector()
    opener.add_handler(http_handler)
    opener.add_handler(https_handler)
    response = opener.open(url, encoded_post_data)

    return response


def getData(mode, topn):
    parameters = []

    #returns an infinite stream of tweets, hence the need to ^C to break out of the for loop
    #use the first URL to get all sort of tweets
    if mode=='live track':
        #url = "https://stream.twitter.com/1/statuses/sample.json" 
        url = "https://stream.twitter.com/1.1/statuses/filter.json?track=Microsoft" #track one subject
        response = twitter_track(url, "GET", parameters)
        for line in response:
            text = line.strip()
            #line is a string so Im doing some very basic (and error prone) string manipulation - room for improvement here
            s= str.find(text,"text")
            e =str.find(text,"source")
            print text[s+7:e-3]
            print ""


    elif mode=="topN":#will return TOP N tweets on the subject
        tweet_count = '&amp;count='+str(topn)    # tweets/page
        queryparams = '?q=Microsoft&amp;lang=en'+tweet_count
        url = "https://api.twitter.com/1.1/search/tweets.json" + queryparams

        #Ignoring the "parameters" variable - quite easy to use the URL
        response = twitter_track(url, "GET", parameters)
        data = json.load(response)#contains all N tweets
        #pprint(data) # data is a dictionary
        for tweet in data["statuses"]:
            print tweet["text"]

#TO DO:
#search term is hardcoded - parametrize it
#clean unnecessary characters, ex: URLS are coming like: http:\/\/t.co\/RC1Z7IaMu5
if __name__ == '__main__':
    #Options:
    #live track: Track Function where all tweets or a single search criteria can be tracked in real-time
    #            Tweets do not repeat, second parameter ignored
    #topN: Displays last N tweets on the subject
  getData("live track",10)


Here is an example of the output:

image

And here is how I called the code to pipe the output to a text file – that will be used on the sentiment analysis:

image


2.Analyse it

The analyse function takes 2 arguments, the first is a link to a “sentiment” file and the second the file we want to analyse. The sentiment file I’m using is called AFINN-111. AFINN is a list of English words rated for valence with an integer between minus five (negative) and plus five (positive). The words have been manually labelled by Finn Årup Nielsen in 2009-2011. The file is tab-separated and contains2477 words.  The code read both files, create a dictionary with word – value pairs from the AFINN file and loops trough the lines on the sentiment file looking up each word on the dictionary just created and summing their “value” on the tweet. (a very simplistic word – by –word approach).


import sys
import json
import operator

def main():

    if len(sys.argv) == 2:
        sent_file = open(sys.argv[1])
        tweet_file = open(sys.argv[2])
    else:
        sent_file = open("AFINN-111.txt")
        tweet_file = open("microsoft.txt")


    #load dictionary
    scores = {}
    for line in sent_file:
        term, score  = line.split("\t")  # The file is tab-delimited.
        scores[term] = int(score)

    #missing_scores = {} #not using this at the moment
    ranked_tweets = {}

    for line in tweet_file:
        line= line.strip()
        if line=="":#ignore blank lines
            next

        #print line
        tweet_score = 0
        try:
            words = line.split()

            for word in words:
                tweet_score += scores.get(word, 0)

            if tweet_score !=0:
                ranked_tweets[line] = tweet_score

        except KeyError:
            continue

    print "Number of tweets scored: "+str(len(ranked_tweets))
    d = dict((k, v) for k, v in ranked_tweets.items() if v &gt; 0)
    print "    Positive Tweets:: "+str(len(d))
    d = dict((k, v) for k, v in ranked_tweets.items() if v &lt; 0)
    print "    Negative Tweets:: "+str(len(d))

    print ""
    print ""

    print "Top 10 Best tweets: "
    for key, value in sorted(ranked_tweets.iteritems(), key=lambda (k,v): (v,k), reverse=True)[0:9]:
        print "   %s: %s" % (key, value)

    print " "
    print " "

    print "Top 10 Worst tweets: "
    for key, value in sorted(ranked_tweets.iteritems(), key=lambda (k,v): (v,k))[0:9]:
        print "   %s: %s" % (key, value)


    #Print all disctionary
    #for key, value in sorted_x.iteritems() :
        #print key, value


if __name__ == '__main__':
    main()


I left the program running for over an hour and collected around 20.000 tweets, of those 3.492 where scored.  One important thing to note (and I just realized that when I saw how low that number was) is that I forgot to fetch only “English” tweets on the “live track” option of the “GetTwitterData” therefore a lot of tweets were just ignored on this step rather than on the first step because the sentiment file is in only English., which explains the low classification rate.

The result is quite interesting, from the 3.492 tweets scored 3667 are positives and 825 negatives, which possibly indicates a good acceptance from the community.

Bellow I print the 10 best and worst tweets (please mind the language on the negative ones)


toptweets


 Things to consider (improve):

·         I see a lot of re-tweets – maybe I shouldn’t consider them? Or if you are re-tweeting something that someone else liked\hated does it mean you like\hate it too?

·         Only consider tweets in English (this is more for the first part of the program)

·         Should I consider a different way to decide whether a tweet was scored or not? Tweet_score “zero” can either mean that no words were scored or that bad words cancelled good words. Is there a difference?


note: thanks to this post on how to post python code

Posted in Python, Twitter | Leave a Comment »